
This step-by-step guide outlines the process of installing a bidet tailored for elderly and disabled individuals, focusing on enhancing hygiene and comfort for those with mobility challenges. The guide emphasizes the importance of accessibility in the bathroom, providing clear instructions on selecting the right bidet model, preparing the installation area, and completing the setup safely and efficiently. By following this guide, caregivers and family members can create a more accommodating bathroom environment that promotes dignity and ease for users with special needs.


Choose the Right Bidet
Research bidet models that prioritize accessibility and ease of use for disabled individuals. Look for features such as remote controls, which enable users to adjust settings without needing to reach awkwardly. Check for adjustable water pressure options to ensure comfort during use, catering to personal preferences. Consider seating height carefully; choose a model that accommodates your needs for safe and easy transfers.
Gather Necessary Tools and Materials
- Gather all necessary tools and materials before starting the installation.
- Ensure you have a adjustable wrench, a set of screwdrivers, and plumbing tape on hand.
- Check that you have all additional parts that came with your bidet, such as mounting brackets or hoses.
- Organize your workspace to keep everything within reach, making the installation process smoother and more efficient.
Turn Off Water Supply
- Identify the water supply valve, usually located on the wall behind the toilet, near the floor.
- Grasp the valve handle firmly and turn it clockwise until it stops, ensuring the water supply is completely shut off.
- Check the toilet for any remaining water by flushing it; if the tank empties, you’ve successfully stopped the water flow.
- Place a towel or bucket beneath the valve to catch any residual water that may escape during the disconnection process.
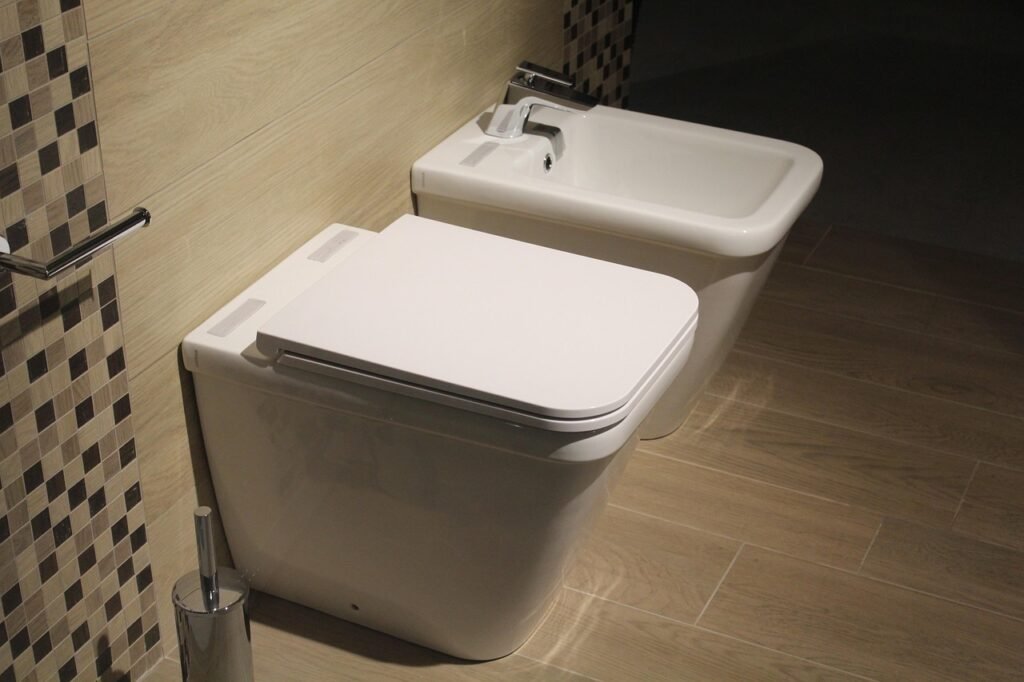
Disconnect the Existing Toilet Seat
Unscrew the bolts that secure the existing toilet seat to the bowl, typically located at the back of the seat. Carefully lift the seat off once the bolts are removed, and set it aside in a safe location. Wipe down the area around the toilet to remove any dirt or debris, ensuring a clean surface for the new seat installation. Double-check that no tools or parts are left behind before moving on to the next step.
Install the Bidet Seat
Position the bidet seat carefully on the toilet base, ensuring that it aligns with the bolt holes. Once aligned, take the provided hardware and secure the seat in place by tightening the bolts. Make sure the seat is stable and doesn’t wobble; adjust if necessary for a snug fit. Double-check that everything is properly fitted before proceeding to the next step.
Connect the Water Supply
Connect the provided hose to the bidet and the water supply. Wrap plumbing tape around the threads of the hose before attaching it to ensure a tight seal and prevent leaks. Tighten the connection securely but avoid over-tightening, which can damage the fittings. Reconnect the water supply valve by turning it clockwise until it is snug.
Test the Bidet Functionality
Turn the water supply back on by rotating the valve clockwise. Check for any leaks around the connections; if you notice any water escaping, tighten the fittings gently. Test all bidet functions by activating the water spray and adjusting the temperature and pressure settings. Ensure everything operates smoothly and comfortably, making adjustments as needed for your preference.
Make Adjustments if Necessary
- Assess the bidet seat for levelness. If it tilts, loosen the mounting bolts slightly, adjust the position, and re-tighten them securely.
- Check the water pressure settings. If the water flow is too strong or weak, locate the water pressure control knob and turn it according to the manufacturer’s guidelines.
- Refer to the user manual for specific instructions on adjusting temperature settings if your bidet includes a heating feature.
- Ensure all adjustments are done carefully to prevent damage and ensure optimal functionality.
Provide Instructions for Use
Turn on the bidet using the power button, usually located on the control panel or remote. Adjust the water temperature by selecting your preferred setting, ensuring comfort during use. Change the water pressure by turning the dial or pressing the corresponding button to find the level that feels best for you. Explore additional features, such as oscillating or pulsating spray options, by selecting them on the control panel for a customized experience.
Ensuring Accessibility and Comfort
In conclusion, installing a bidet for disabled individuals is a thoughtful way to improve their daily routine and overall well-being. By following the outlined steps, you can ensure a successful installation that promotes comfort and hygiene. Remember, the key is to take your time, prioritize accessibility, and familiarize the user with the bidet’s features for the best experience. With the right setup, you’re not just enhancing a bathroom; you’re making a meaningful difference in someone’s quality of life. Happy installing!
Essential Supplies Needed

Essential Installation Advice
Step-by-Step Guide to Using a Bidet for Enhanced Comfort and Independence
- Familiarize Yourself with the Controls: Before using the bidet, take a moment to explore the controls. Most models have straightforward buttons for water temperature, pressure, and nozzle position. Knowing what each button does will make the experience smoother
- Adjust the Height and Position: If possible, adjust the seat height or the angle of the bidet to ensure it’s comfortable and accessible for you. This can make a big difference in your overall experience
- Start with Gentle Settings: When you first use the bidet, begin with the lowest water pressure and a comfortable temperature. You can gradually increase the pressure or temperature as you feel more comfortable
- Use Supportive Accessories: Consider using a grab bar or a non-slip mat near the bidet for added stability and safety. This can help you feel more secure while using the bidet
- Practice Patience and Comfort: Take your time to get used to the bidet. It might feel a bit strange at first, but with a little practice, it can become a comfortable part of your routine. Always ensure you’re seated securely before starting the wash
- Feel free to take it at your own pace, and enjoy the benefits of using a bidet!

My dad has mobility issues and using a bidet has made things so much easier for him. We installed a Brondell Swash 1400, and it’s fantastic! Wish we’d done it sooner.
Thanks for sharing your success story! The Brondell Swash 1400 is a solid choice and we’re thrilled to hear it’s made a positive impact for your dad.
Thanks for sharing your experience! The TOTO Washlet S550e is indeed a great choice for accessibility and comfort. We’re glad it’s working well for your mom!
I was worried about the installation process since I’m not very handy, but following your guide made it so simple! It took me about 30 minutes, and now my bidet is up and running. Thanks a bunch!
So glad to hear that the guide helped you! It’s always nice to know that our instructions can make a difference. Enjoy your new bidet!
Could you write an article on best bidet options for small bathrooms? I think that would really help a lot of us out here who are trying to make the most of limited space.
Great suggestion! We’ll definitely consider covering bidet options for small spaces in future articles. Stay tuned!
I struggled with connecting the water supply because the fittings were too tight. Any tips on how to loosen them without damaging anything? I don’t want to break my new bidet!
We recommend using a pair of adjustable pliers with a cloth to protect the fittings. If they’re really stuck, applying some penetrating oil might help loosen them up. Be sure to give it some time to work in!
Can you recommend a good bidet for users with limited hand mobility? I want to make sure the controls are super easy to use.
Absolutely! The BioBidet BB-2000 has user-friendly controls and a wireless remote, making it a great choice for those with limited mobility. We hope this helps!
Do you think you could cover maintenance tips for bidets in the future? I want to make sure mine stays in great shape for years to come.
That’s a fantastic idea! We’ll add maintenance tips to our list for future articles. Keeping your bidet in top condition is essential for its longevity!
Hey, I just installed a TOTO Washlet S550e for my mom, and it’s been a game changer! Super easy to use and the heated seat is amazing for her. If you’re looking for something user-friendly, I totally recommend it!